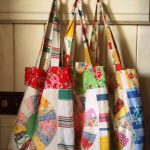
You may buy hundreds of readymade patchwork bags from the shop but none will compare to the one you create. Handmade patchwork bag has a distinct charm of its own and none can deny its unique appeal. Your bag will be your OWN! None can have the same!
Exciting enough?
Good, then let’s learn how to make a patchwork bag. This article is not a vague one. Here we will run you through all the things you will need, down to their measurement, and some pro tips to efficiently create a tote bag. So without any further delay, let’s check it out.

Required Items
- 2 packs of fabric Paris palette charms. You can also buy 20 pieces of fabric each of 5 x 5 inches.
- 3 fabric single palette, each of 18 x 21 inches – 2 of these should match for lining and 1 for the tab and handle
- the fusible fleece of 19 x 45 inches
- thread to coordinate
- 1 large sew on
Essential craft items
- heavy cardboard of 5 x 14 inches
- glue
- cutting mat
- rotary cutter
- iron for pressing the fabric and the finished bag
- sewing machine to sew the fabric together
- acrylic ruler
- basic sewing items like needles and others
- Removable fabric marker – you can remove the marks after completion of the sewing process. That way, your tote bag won’t look dirty.
How to make
This is the most interesting part. Keep reading to know all about it.
Cut two singles – each of 18 x 21 inches for the lining
Cut 1 single – 4 x 21 inches for the handles, 8 x 18 inches for the cardboard bottom cover ad 2 x 2 ½ inches for the handle tabs
Cut fusible fleece – 18 x 22 ½ inches
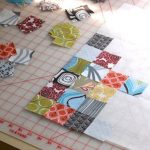
Now arrange the charms in four distinct rows. Decide a pattern before arranging the charms. Do you want alternative colors in each row or absolutely unique color in each row? There’s no hard and fast rule so you can easily explore your imagination. Remember this will be the front part of your patchwork bag. So be really creative.

Now sew the charms in the rows and then keep pressing. Then sew the rows together and nest the seams. Then again press. Remember that the pieces should measure about 18 x 22 ½ inches. This measurement will help you to produce a balanced design at the first go.
Once the front part is done, repeat the same thing for the backside. You can use two distinct designs with two distinct color set of fabric for each side of the bag. That way you can use it alternatively both the sides and the bag will look as new! Isn’t that a cool trick? Oh, and the process remains just the same. Only ensure to invest in multiple colored fabrics if you want two distinct looks on both sides. Say, if the front side is pink and black, the backside can be yellow and red!
We hope you have found this article useful. Try it and let us know!