Let me tell you, traditional quilt works were always made by hands. These days, many seek to use machines for convenience but if you don’t have a machine, it’s a boon really! Also, many perfectionist quilters seek to quilt by hand despite having a sewing machine. According to them, a handmade quilt work is more beautiful and elegant than the machine-made one.
The reason is that, while quilting by hand, you can design extremely intrinsic patterns, usually difficult to do with ordinary machines. And you need not invest in a pricey sewing machine for quilting since only a few pins and two active hands are enough for that!

Here’s a step by step guide on how to do patchwork quilting by hand. Take a look.
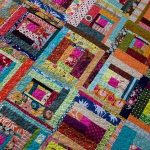
Detailed and intricate quilt patterns are all very good, but even a simple patchwork quilt has a distinct charm that is designed with the utmost attention. You can do it by hand even if you are a beginner. Get the hand of sewing together some blocks of fabrics and then stitch the blocks into rows.
Sounds exciting, right? It sure is!
Read the following passages to learn all about it!
Make a patchwork quilt without panel by hand
- Step one – cutting
You have to cut about 42 pieces of your fabric stack – each of 9×9 inches. However, if you don’t want to cut the stack, you may not. This is the best part that I love about patchwork quilting. There’s no hard and fast rule. You can reveal your true artistic self and design your patchwork quilt item just as you want. So each item becomes unique and customized. A little change can bring an immense difference in the outcome. For instance, if you don’t cut the fabric stack, the quilt will be a bit larger – say about 57×66 inches. Isn’t it awesome?
- Step two – decide the layout
Before designing a wall around the quilt blocks, it’s better to decide a layout. It will help you to have an overall design. Once you have a layout in your mind, you can go on and sew. This is more effective and neat than starting to sew and making a layout afterward.
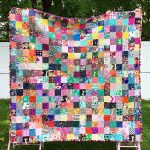
Here’s a beautiful layout to start with. You can have two grommets in each corner and remove it once you stop using it. You may have 7 rows with 6 squares in each row. Space out the fabric color in an even manner while laying out.
You can also try your own layout design.
- Step three-pin and sew the squares
This is the third and final step. Once you get a layout, pin the squares and keep sewing. You may use 1/4th seam allowance to stitch the squares in the rows. Also, make sure to keep the rows labeled when you sew.
That’s all. Now press the entire quilt work for a neat outcome.
I hope you have found the article useful. Your comments will inspire me to share more of such information. Let me know your valuable thoughts.

How do I obtain The Violet Quilt Pattern.