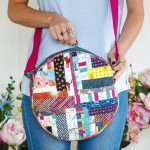
A few days back I made a patchwork bag and my followers on Instagram wanted to know the details. At first, I thought to share it with them in a short Instagram video but that wouldn’t be permanent and it would be inconvenient for everyone to check out while designing a patchwork bag.
Ultimately, I decided to write an article on it. Let me know if it was helpful. Your feedback will help me to share more such patchwork items. So let’s get into it.

I recommend you to use Quilter’s Grid 820, produced by Pellon. It has a lightweight texture interfacing along the 1-inch grid line.
With the patchwork pieces already attached along the grid line, sewing these together will not be a big deal. Here are some effective tips to make it look better.
What Will You Need
You have to cut about 66 squares to design 1 tote. The large tote bag utilizes 4-inch squares and is usually of 17 ½ inch x 7 inches (without handles). The medium tote bag contains 3-inch squares and is usually 12 ½ inch x 5 inch (without handles). And the small tote bag features 2-inch squares and is around 7 ½ inch x 3 inch (without handles).
You will also need:
- 1/4 yard to 1-yard cotton fabric to make the bag lining
- fusible interfacing for the medium size bag
- lightweight fleece for the large size bag
How to Make the bag
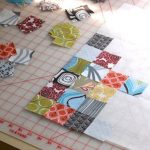
- On the printed side of the Grid, outline the boundaries of the front side of the bag 5 x 4 patches. Then cut around the outlined area and add ½ inch all around.
- Then repeat the same for all of the parts of the blog
- Turn the Quilter’s Grid over in order to keep the fusible side face up. Cut more or less 25 squares for the front side of the bag or as desired. You may place a plain paper under it for greater convenience.
- Now press the bag for around 5 to 8 seconds on each area. The grid interfacing refuses to tolerate hot iron, so ensure to use pressing paper to protect it.
- Organize patchwork squares on the Quilter’s Grid pieces which you have already cut and fused with measurement.
Before starting to sew the interfacing, clip the seam along with the stitching to keep the bag flat. Now sew the vertical seams and don’t forget to use clipping.
Next, come the horizontal seams. Clip the corners while sewing the horizontal seams for an improved and professional look.
After the sewing process is done, ensure to press the seams. Don’t forget to place a pressing paper right below the patchwork in order to protect the ironing board from the used glue. Also, use a pressing cloth so as to protect the interfacing from direct heat.
Repeat all these steps with other patchwork pieces as well.